Automating a Custom Label Maker using VBA in Excel
For over a decade a medical supplies warehouse has stocked group homes of all their tenants over the counter medical supply products. Since each there were so many boxes with each order, every box needed a custom label so clients knew whose monthly supplies were whose. Every sheet of labels was made of 10 columns by 3 rows and each label was formatted in the following layout:
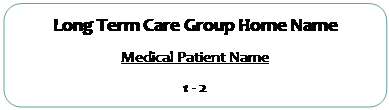
The 1-2 stands for 1st box of 2 boxes with this order and 2-2 stands for the last box. One house would have up to 25 customer orders and each customer has 9-35 boxes on average. The process of writing or typing each label individually was costing a total of 8 man hours per day on average and often items were mislabeled due to ever increasing volumes of orders.
WareHouse Label Maker Interface

The user interface for this situation ended up being most efficient by utilizing a table for the warehouse employee to fill out and a button to trigger a macro to make labels.
Instead of handwriting each label, automating the labels saved an exponential amount of time. Whether a customer order has 2 or 52 boxes, it always took the same amount of time to make the labels as if the customer had only one box. The result of the Make Labels button populates Sheet1 with labels ready to print.

The VBA Label Maker Code
In this example a lot of customization code was implemented to fit the needs of the business. For the sake of simplicity, the bare bones of using VBA to make dynamic labels is supplied here. There are two pieces to this code. This first code will apply the label formatting on Sheet1 to get the dimensions set. This macro can be placed in a regular module to be ran.
Sub LabelMaker_Start()
' converts a single column of data into multiple columns of data formated for labels

Sheets(“Sheet1”).activate

‘The macro calls a procedure located in the Sheet1 worksheet
    	Application.Run  thisworkbook.name & "!Sheet1.ColtoRows"

    Cells.Select
    Selection.RowHeight = 75.75
    Selection.ColumnWidth = 34.14

    With Selection
        .HorizontalAlignment = xlCenter
        .VerticalAlignment = xlBottom
        .WrapText = True
        .Orientation = 0
        .AddIndent = True
        .IndentLevel = 0
        .ShrinkToFit = True
        .ReadingOrder = xlContext
        .MergeCells = False
    End With
    With Selection
        .HorizontalAlignment = xlCenter
        .VerticalAlignment = xlCenter
        .WrapText = True
        .Orientation = 0
        .AddIndent = True
        .IndentLevel = 0
        .ShrinkToFit = True
        .ReadingOrder = xlContext
        .MergeCells = False
    End With
End Sub
The second portion of VBA code is called at beginning and is located in Sheet1.
Sub ColtoRows()
Dim RNG As Range
Dim i As Long
Dim j As Long

Set RNG = Cells(Rows.Count, 1).End(xlUp)
j = 1
On Error Resume Next

nocols = InputBox("Enter Number of Columns Desired", "Number of columns across label sheet", "3")

For i = 1 To RNG.Row Step nocols
Cells(j, "A").Resize(1, nocols).Value = _
Application.Transpose(Cells(i, "A").Resize(nocols, 1))
j = j + 1
Next
Range(Cells(j, "A"), Cells(RNG.Row, "A")).ClearContents
End Sub