Automating a Custom Label Maker using VBA in Excel
Warehouse Label Maker
For over a decade a medical supplies warehouse has stocked
group homes of all their tenants over the counter medical supply products.
Since each there were so many boxes with each order, every box needed a custom
label so clients knew whose monthly supplies were whose.
Every sheet of labels was made of 10 columns by 3 rows and
each label was formatted in the following layout:
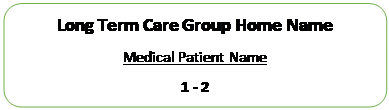
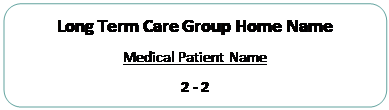
The 1-2 stands for 1st
box of 2 boxes with this order and 2-2 stands for the last box. One house would
have up to 25 customer orders and each customer has 9-35 boxes on average. The
process of writing or typing each label individually was costing a total of 8 man hours per day on average and often items were
mislabeled due to ever increasing volumes of orders.
Implementing a friendly user interface
The
user interface for this situation ended up being most efficient by utilizing a
table for the warehouse employee to fill out and a button to trigger a macro to
make labels.

Instead of handwriting each label, automating the labels
saved an exponential amount of time. Whether a customer order has 2 or 52
boxes, it always took the same amount of time to make the labels as if the
customer had only one box. The result of the Make Labels button populates
Sheet1 with labels ready to print.

The company also benefited from a decrease in mistakes from
sloppy handwriting or miscounting. By exporting a log of these entries into a
database, the company was able to better forecast inventory supply orders
ultimately allowing the warehouse to decrease backorders.
The VBA Label Maker Code
In this example a lot of customization code was implemented
to fit the needs of the business. For the sake of simplicity, the bare bones of
using VBA to make dynamic labels is supplied here.
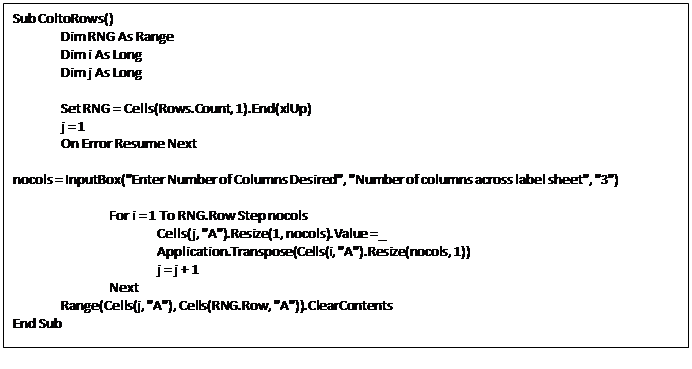
There are two pieces to this code. This first code will
apply the label formatting on Sheet1 to get the dimensions set. This macro can
be placed in a regular module to be ran.
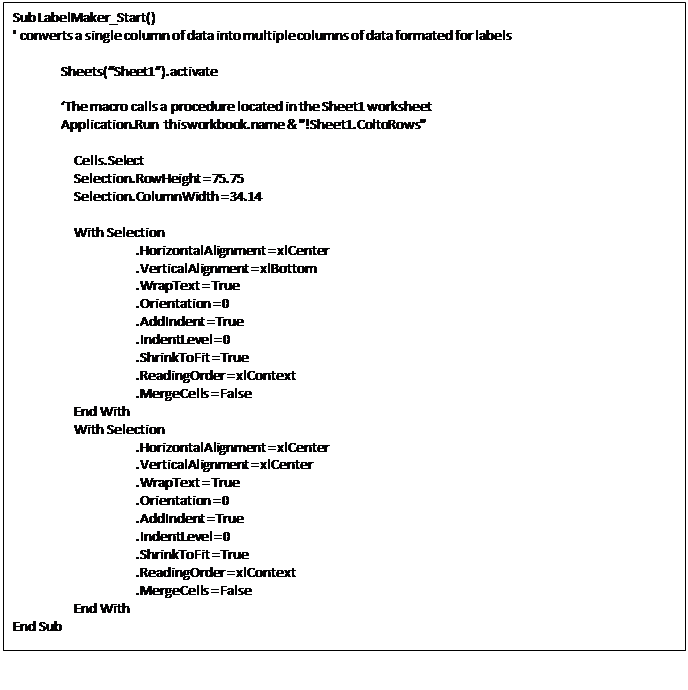
The second portion of VBA code is called at beginning and is located in Sheet1.
Automating an Excel Workbook to Install an Add-In to Excel
Using VBA to add an Add-In
I was assigned a task to update an
outdated Excel Add-In VBA project so the office could
upgrade their version of Microsoft Office. After updating the code, part of my
job was implementing a strategy to batch release the updated Add-In. My client
requested a way of doing this so new employees could use the Add-In application
without having security prompts and without changing the security settings. This
is the Enable Editing warning that pops up each time the user opens a new
workbook from the new Add-In Toolbar:

Batch release an Add-In update
One way to batch release the
application update without changing security settings is to request they add it
to their trusted files. This will put the file in a special trusted folder and
suppress the Enable Editing warning message thereafter. Another way is to
automate this choice and have the Add-In Ribbon Toolbar be able to run macros
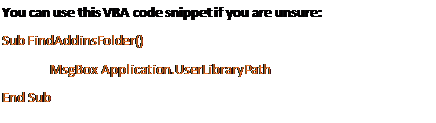
for an application without any user input on any security setting. For Excel 2007 and later, each excel user
has a special Add-Ins folder. This is the file path that opens when hitting
browse in Excel-Addins. In Windows 10 the file folder
path looks like this: C:\Users\UserName\AppData\Roaming\Microsoft\AddIns
Some Things to Remember about Excel Add-Ins
·
An Add-In file is the same as a .xlsm file but is saved as .xlam
·
.xlam files differ in
that they do not have visible worksheets for the user
·
An Add-In is a VBA project that contains the
code to utilize an application
VBA Code to automate this process is in the Workbook Module of the .XLSM
file
The
Workbook Module controls the code that will trigger upon a predetermined event
by the workbook. This is common for running code when a workbook opens or
closes. We want the .xlsm file to check to see if the
user has the Add-In and if they don’t, prompt the user to install the Add-In.
From there the .xlsm is no longer needed and can be
closed. The next time excel is opened, your Add-In will be displayed as an
available Add-In in the Excel-Addins menu. Activating
the Add-In, in my case, turns on the custom toolbar tab for the application.
In the workbook
module of the macro file you are turning into an add-in, enter the
following code:
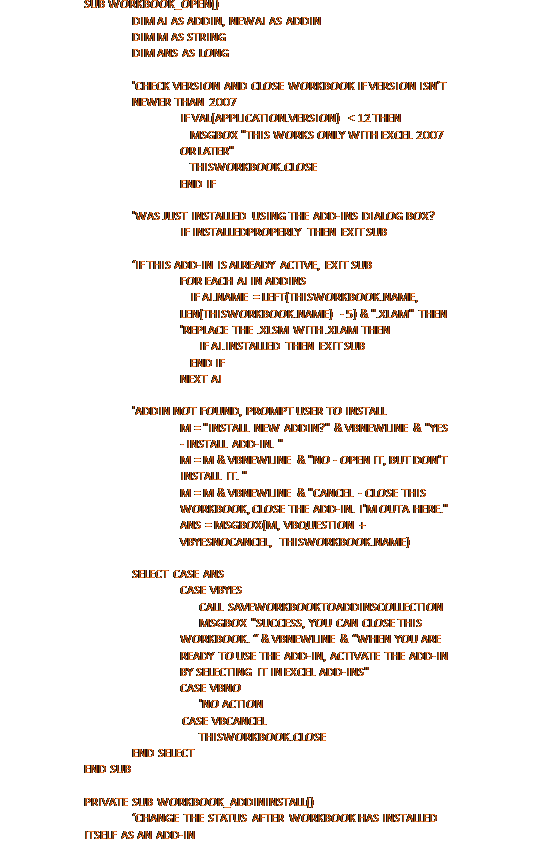
Each time the workbook is opened, the
procedure to check for the updated Add-In will occur. If the Add-In is not
found, the user is asked to install it with a command prompt. If the user
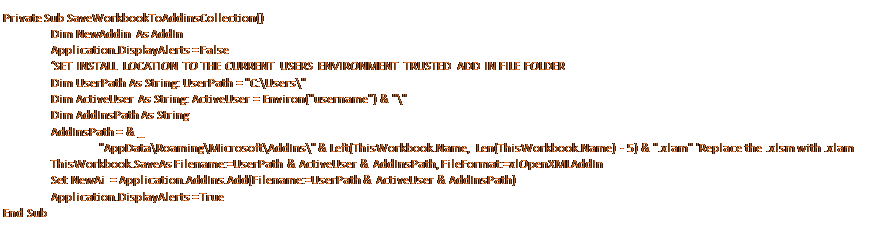
selects yes then the sub routine SaveWorkbookToAddinsCollection
will be triggered. This macro dynamically installs the .xlsm
file running the code as a .xlam file into the
trusted Add-Ins folder. This macro can go into the workbook module as well.
Successful installation walk-through
In my
project, the Add-In was an application called JEM that is controlled via a new
Ribbon tab named JEM in the ribbon toolbar.

Once
the workbook is opened, the user will see a prompt for installing the updated
Add-In.

After
the installation, the user can activate the new Add-In from the Excel AddIns Menu.

Workbooks
will display the newly updated ribbon tab after pressing ok and will not
receive pesky Excel messages to run the application’s code.
